
Why Is My Vegetable Root-Bound? (And How to Fix It)
If your container vegetable is wilting between waterings even though you just watered it yesterday, has basically stopped getting bigger, or you’re seeing roots poking out of the drainage holes, the plant is very likely root-bound. That means its roots have run out of room, filled the pot, and started circling — and a crowded root system can’t take up water or nutrients fast enough to keep the plant happy.
This post contains affiliate links, meaning we may earn a small commission at no extra cost to you — full details are on our Affiliate Disclosure page.
The good news: root-bound is fixable, and in most cases it’s not fatal. What you do next depends on timing — whether you’re planting a nursery transplant, tending a plant mid-season, or managing a perennial herb that’s been in the same pot for years. This post walks through the signs, the causes, how to check safely, and exactly how to fix (or ride out) each situation.
What “Root-Bound” Actually Means
A plant is root-bound (also called pot-bound) when its roots have filled all the available soil space in the container and started growing in a spiral around the inside wall of the pot instead of spreading outward. University of Minnesota Extension describes this as roots “growing in a spiral around the soil ball” — a tight, circling mass rather than the loose, branching root system a plant grows when it has room. Once roots hit the pot wall with nowhere left to go, they turn and follow it around, and eventually they can even choke (girdle) each other and the base of the plant.
The practical problem for a container vegetable gardener is water and nutrients. A dense mat of roots has much less actual soil left between the roots to hold moisture, so water runs through the pot fast without being absorbed — which is exactly why root-bound plants dry out so quickly and can show scorched, browning leaf edges even when you’re watering on schedule. If this sounds like what you’re seeing, it’s worth reading through our broader troubleshooting guide for dying container vegetables too, since a root-bound pot is one of several causes of the same “always thirsty, never growing” pattern — this post goes deep on that one specific cause.
The Signs — Above and Below the Soil
You can usually spot a root-bound plant before you ever pull it out of its pot. Here’s what to look for.
Above the soil
- The plant needs water far more often than it used to, and the soil dries out within a day or less even in mild weather
- Growth has stalled — no new leaves, no height gain, fruiting has slowed or stopped for no obvious reason (not a nutrient or pest issue)
- Leaf tips or margins turn brown and crispy (tip dieback or marginal necrosis) because the roots can’t keep up with water demand, a pattern UMD Extension links directly to pot-bound plants
- The plant looks top-heavy or tips over easily, or wilts hard in the afternoon sun and only partly recovers overnight
Below the soil (and at the drainage holes)
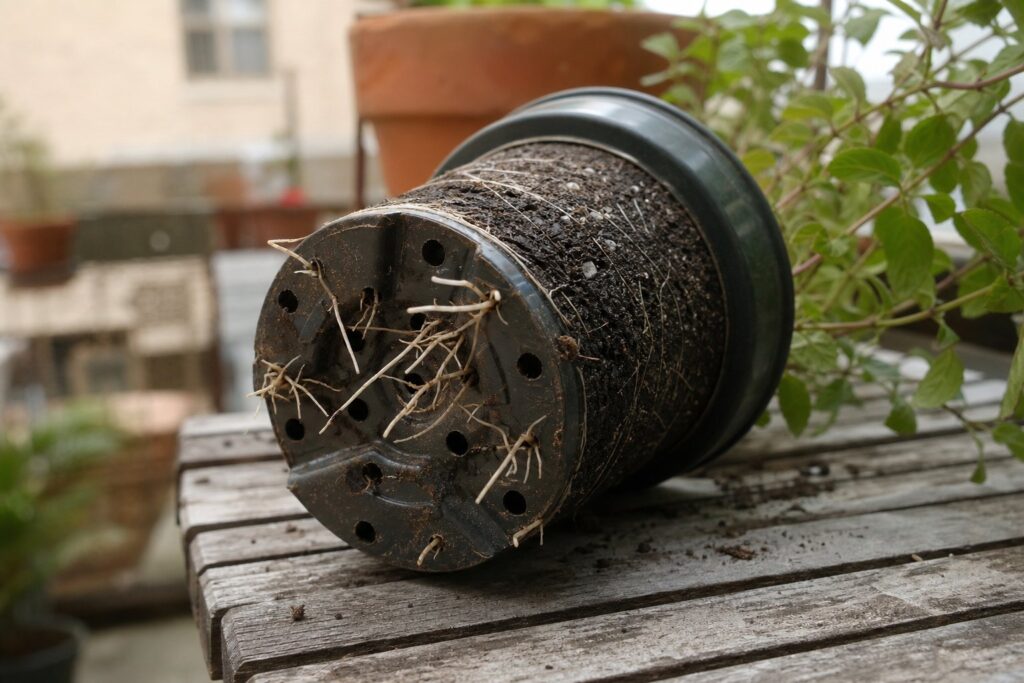
- Roots are visibly emerging from the drainage holes at the bottom of the pot
- Roots are pushing up and circling on the soil surface
- Water runs straight through the pot and out the bottom within seconds of pouring it, instead of soaking in
- When you do slide the plant out, you see a tight mass of roots that has taken the exact shape of the pot, with little to no visible soil left
If several of these line up, the fix depends on when in the season you’re catching it — more on that below. If watering itself has become confusing on top of this, our guide to how often to water container vegetables is a good companion read, since a root-bound pot changes the watering math.
Why It Happens
Root-bound plants come from one of two situations, and they call for slightly different fixes.
The pot is too small for the crop. Every vegetable has a mature root volume it needs to actually finish its season — a tomato or pepper simply needs more room than a lettuce or a radish. If you started a tomato in a container sized for herbs, it will out-root the pot well before it out-produces it. See our guide to pot size and drainage for the fundamentals, and the table further down this post for size targets by crop.
The transplant was held too long in its nursery pot. This is extremely common with store-bought starts. A transplant that sat on a shelf or in a greenhouse tray past its ideal planting window keeps growing roots in that small cell or pot long after the foliage “outstrips the delivery capacity of the root system,” as Cornell Cooperative Extension’s vegetable program describes it — meaning the plant is already stressed and root-bound on the day you bring it home, before it’s even in your container. These plants often look fine on top but come out of the nursery pot as a solid root mass. If you buy transplants, plan to deal with this at planting time rather than assuming a fresh pot will fix it on its own.
How to Check Without Killing the Plant
You don’t need to yank on the stem to check. University of Maryland Extension describes the same gentle method nurseries use: knock the pot against a hard surface to loosen it, tilt it upside down with your hand over the soil, and gently ease the plant out. (For a big pot, lay it on its side and tap or squeeze the walls instead.) The whole root ball should slide out in one piece. If it comes out as a tight, pot-shaped cylinder or ball of roots with little visible soil, it’s root-bound. If it comes out loose and crumbly with soil still visible between roots, it isn’t — you can simply set it back in the pot and it’s not the problem.
Do this check on a mild day, out of direct hot sun, and have your new pot and soil ready before you start so the roots aren’t exposed to drying air for long.
How to Fix It
Up-potting an established plant
For a plant that’s already been growing in your container for a while, move it into a container that’s meaningfully bigger — not just an inch bigger. The University of Georgia Extension’s repotting guidance recommends choosing a new pot 3 to 4 inches larger in diameter than the current one, which for a 5-gallon bucket-grown tomato might mean stepping up to a 10-gallon fabric grow bag rather than a container just slightly larger. Fresh mix matters here too, since the old mix has often broken down and compacted around those roots — a bag of fresh potting mix gives the new roots something to actually grow into.
While it’s out of the pot, loosen the outer layer of circling roots by hand, working from the bottom up. If they’re tightly wound, cut them with a clean, sharp knife or pruners. University of Minnesota Extension describes vertical cuts down the sides of the root ball, just deep enough to cut through the net of roots, plus a crisscross cut across the bottom. University of Maryland Extension suggests cutting about a half-inch into the healthy roots every two to three inches, and UGA Extension says to slice off the outer half-inch of matted roots on a strongly root-bound plant. This looks aggressive, but it stops the roots from continuing to circle and encourages new roots to grow outward into the fresh soil instead. Set the root ball at the same depth it was growing before (a little deeper is fine for tomatoes, which root along a buried stem), backfill, water thoroughly, and keep the plant out of harsh afternoon sun for a few days while it adjusts.

Fixing a root-bound transplant before you plant it
If you’re planting a store-bought tomato, pepper, or herb start and it slides out of its nursery pot as a tight root ball, don’t just drop it into your container as-is. Gently tease the roots apart with your fingers, working from the bottom and sides, to break up the circling pattern and spread them out. If the roots are matted tight enough that teasing doesn’t work, use the same vertical-scoring approach described above — a few shallow cuts around the sides is enough for a small transplant. This step is quick, it’s the single best thing you can do at planting time to prevent the plant from staying root-bound for its whole season, and it’s exactly why our guides to growing tomatoes in a 5-gallon bucket and growing peppers in containers both recommend starting with the right pot size from day one — a properly sized pot gives loosened roots somewhere to actually go.
When it’s too late mid-season
If you’re deep into the growing season — say a tomato is loaded with green fruit in August — a full up-pot can do more harm than good by shocking a plant that’s putting its energy into ripening. In that situation, it’s usually smarter to leave the roots alone and manage around the problem instead: water more frequently and in smaller amounts (root-bound pots often need watering once or even twice a day in hot weather), watch for the leaf-edge browning that signals it’s falling behind, and consider a weekly diluted liquid fertilizer since a crowded root system can’t forage as widely for nutrients. Ride it out to harvest, then up-pot or start fresh in a bigger container next season. Trying to force major root surgery on a fruiting plant in high heat is more likely to stall it further than help it.
Prevention — Right Pot Size From the Start
The easiest fix for root-bound plants is never needing one. University of Maryland Extension’s container-size guidance groups vegetables by mature size, and it’s a good baseline for sizing pots before you plant — with a size step up if you’re growing an especially vigorous or indeterminate variety:
| Crop | Minimum container size | Minimum depth |
|---|---|---|
| Tomatoes, peppers, eggplant, cucumbers, winter squash | 8–10 gallons | 12–16 in. |
| Beans, summer squash, chard, carrots, beets, dwarf tomato/pepper varieties | 4–6 gallons | 8–12 in. |
| Lettuce, spinach, salad greens, radish, scallions, peas | 1–3 gallons | 4–6 in. |
| Basil, cilantro, thyme, mint, and other small herbs | 1–3 gallons | 4–6 in. |
| Potatoes | 30 gallons | not given |
These are minimums, not maximums — sizing up from there rarely hurts a heavy feeder like a tomato. For the full reasoning behind these numbers, including drainage requirements, see pot size and drainage.

Vegetables vs. Perennial Herbs: Different Timelines
Most vegetables are annuals — they grow, produce, and finish within one season, so as long as you start them in a properly sized pot, they typically never have time to become seriously root-bound before the season ends. The exceptions are transplants held too long before you buy them (covered above) and long-season crops like indeterminate tomatoes or peppers grown in an undersized pot.
Perennial herbs are a different story. Rosemary, mint, sage, thyme, and other perennial herbs live in the same container for years, and their roots keep filling the pot season after season even after top growth slows down for winter. These plants need a periodic check and, eventually, either up-potting into a larger container or root pruning and dividing to keep them healthy long-term — the same 3-to-4-inch-larger-pot rule and root-loosening technique described above for up-potting applies here too. Mint in particular is notorious for filling a container with roots within a single growing season because of how aggressively it spreads, so don’t be surprised if a mint pot needs dividing annually. For day-to-day care of these herbs in containers, see our basil, rosemary, and mint windowsill herb care guide, and plan to check perennial herb pots for circling roots at least once a year, ideally in spring before new growth kicks in.
Frequently Asked Questions
Can a root-bound vegetable plant recover?
Yes, in most cases. If you catch it early in the season, up-potting into a larger container and loosening or lightly scoring the circling roots usually lets the plant bounce back within a week or two. Late in the season, the safer move is to water more often and let it finish rather than disturbing the roots.
How do I know if my plant is root-bound without pulling it out of the pot?
Watch for soil that dries out within a day, roots coming out of the drainage holes, stalled growth, and crispy brown leaf edges. If you see several of these together, it’s worth sliding the root ball out to confirm.
Is it bad to buy a root-bound transplant from the nursery?
It’s common and not a dealbreaker, but you shouldn’t plant it as-is. Gently tease the roots apart, or make a few shallow vertical cuts if they’re tightly matted, before setting it into your container so the roots grow outward instead of continuing to circle.
How much bigger should the new pot be when I up-pot a root-bound plant?
Aim for a container about 3 to 4 inches larger in diameter than the current one. Going just slightly bigger doesn’t give the roots enough new soil to grow into and the plant can become root-bound again quickly.
Do perennial herbs like rosemary and mint get root-bound the same way as vegetables?
Yes, but on a longer timeline. Since they live in the same pot for years instead of one season, check perennial herbs for circling roots at least once a year, ideally in spring, and up-pot or divide them as needed — mint especially can fill a container within a single growing season.
Next step: If you’re not sure whether root-bound is really your problem, start with our broader container vegetable troubleshooting guide to rule out other causes, then double-check your setup against pot size and drainage and how often to water container vegetables before you plant your next round.
Sources
- University of Maryland Extension — Pot-Bound Indoor Plants
- University of Maryland Extension — Potting and Repotting Indoor Plants
- University of Maryland Extension — Types of Containers for Growing Vegetables
- University of Minnesota Extension — Planting and Transplanting Trees and Shrubs
- University of Georgia Extension (CAES) — Repotting Basics
- University of Georgia Extension — Growing Herbs in Containers 101
- Cornell Cooperative Extension — Vegetable Edge: It’s All About the Transplant